
Sending Our Recipe Cards Wirelessly: What to Check First
Published ·6 min read
Cable at home, camera up on a tripod, and a recipe card you want to try right now? 📡 Good news: you no longer have to type it in or dig for a USB cable. Here is the recipe-card reader’s guide to going wireless.
Short answer: since AlphaLuma 1.1.3 (App Store, 2026-10-03; China edition 1.1.5, 2026-09-29), this third-party iPhone app writes a whole Creative Look recipe — the look, eight adjustments and both white-balance shift axes — into a Sony camera over Bluetooth, a Wi-Fi Direct QR code or the same local network, as well as over USB. The α7 V is verified on every path; the camera needs Creative Look in its menu.
·Sony Film Simulations and AlphaLuma are third-party community tools for Sony Alpha photographers. Not affiliated with, endorsed by, or sponsored by Sony Group Corporation.
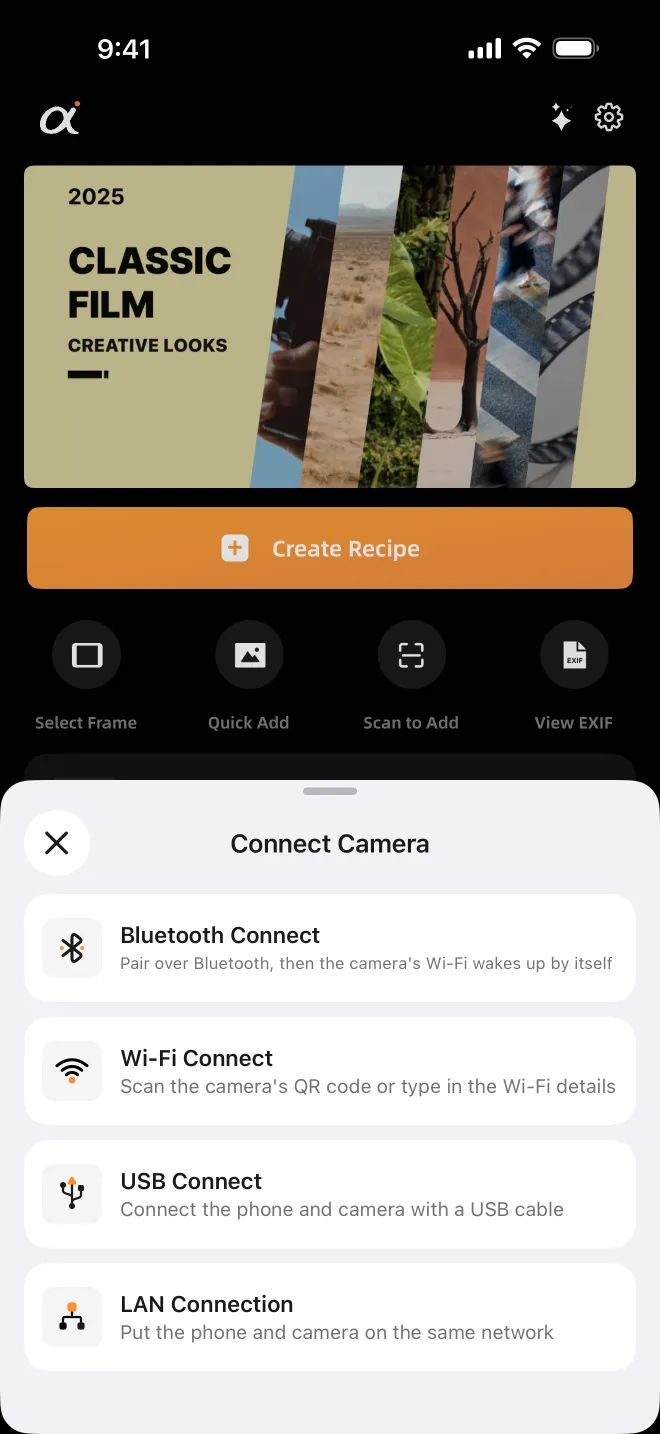
Four ways in, one result
| Best for | What you need | Phone stays online | Tested on | |
|---|---|---|---|---|
| Bluetooth | Out shooting — pair once, then the app wakes the camera hotspot for you | Nothing extra; the camera makes its own hotspot | No | α7 V |
| Wi-Fi (QR code) | When Bluetooth won’t pair, or a borrowed camera | The QR code on the camera screen, or the hotspot name and password | No | α7 V |
| Same network (LAN) | Long sessions at home or in the studio | A Wi-Fi router both the camera and iPhone can join | Yes | α7 V, α7R V |
| USB | The most stable link | A data cable (plus an adapter on iPhone 14 and earlier) | Yes | α7 V, α7 IV, α7C II, α7CR, α7R V, ZV-E1 |
Swipe sideways to see the whole table →
Whichever path you pick, you get the same things: recipe import, Camera Monitor and Recipe Lab all work on every path.
Before you start
- An iPhone on iOS 15 or later and AlphaLuma 1.1.3 or later (China edition 1.1.5 or later); Camera Monitor and Recipe Lab need iOS 16 or later.
- A Sony body with Creative Look in its menu.
- Creators’ App and Imaging Edge closed — the camera accepts only one remote connection at a time.
- When iOS asks for Local Network access the first time, allow it, or no wireless path will work.
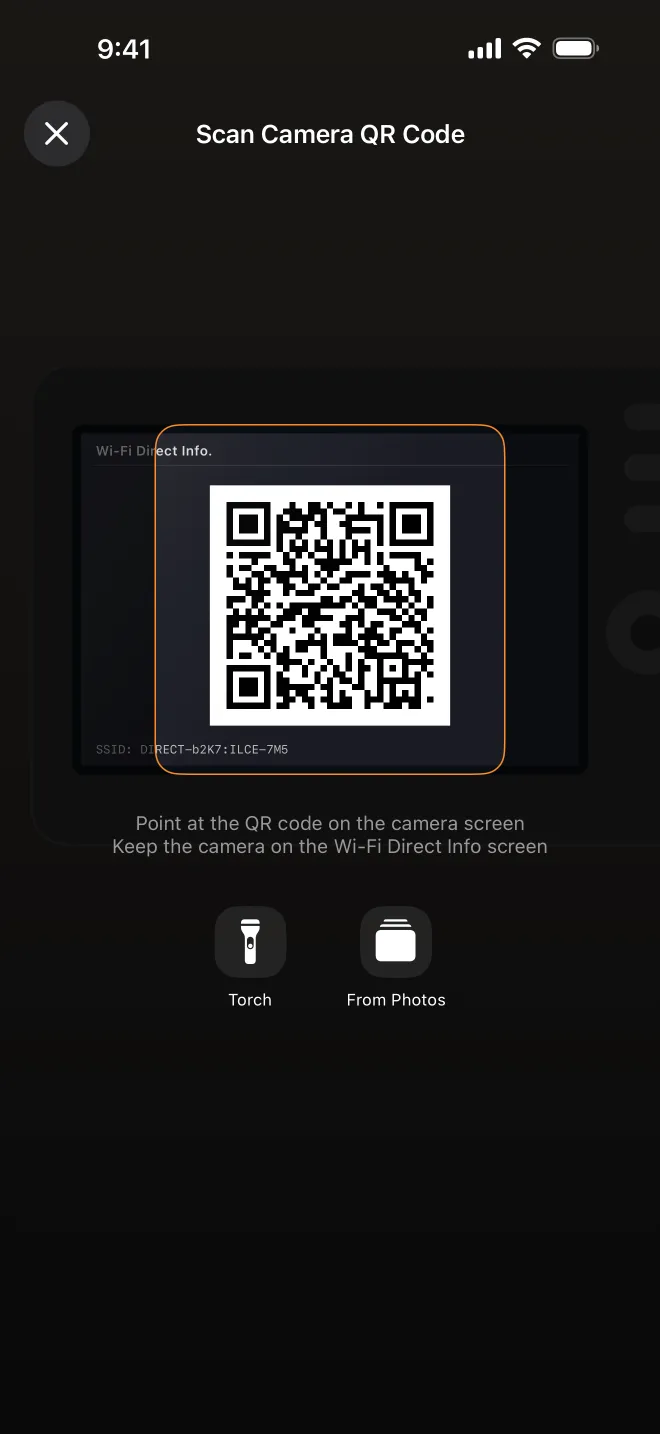
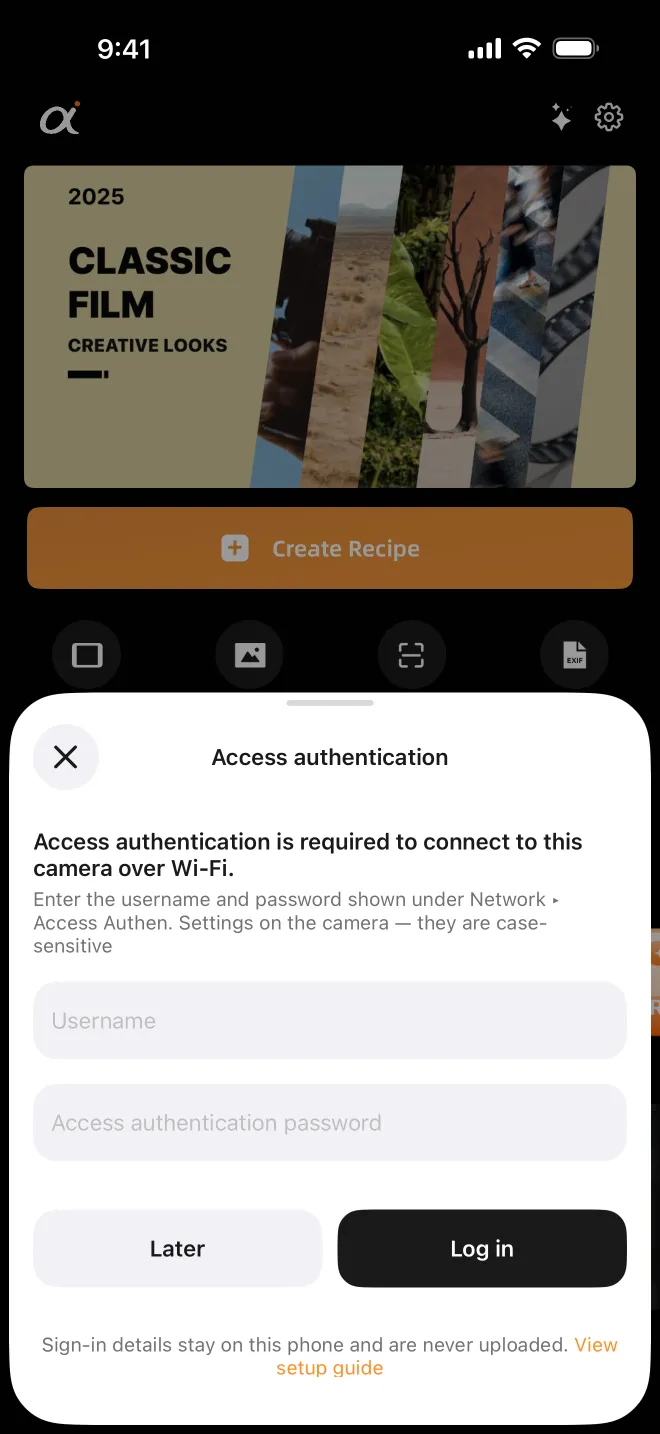
First connection over Wi-Fi, in four steps
- Turn on remote shooting. On the α7 V: MENU → Network → Connect/Remote Shooting → Remote Shooting Function → turn on Remote Shooting, then open Wi-Fi Direct Info. Menu names vary a little between bodies; the guide in the app shows yours.
- Show the QR code. Wi-Fi Direct Info shows the hotspot name and password first — press the camera’s delete (trash) button to bring up the QR code, then tap Scan Camera QR Code in the app. You can also pick a photo of the code or type the details by hand.
- Access authentication, once. Enter the user name and password from Network → Access Authen. Settings. They are not “admin”, they are case-sensitive, and they stay on your phone.
- Connected. You see the camera model and battery level, with shortcuts to import a recipe or open Camera Monitor.
The other paths, one line each
- Bluetooth: on the camera open Network → Connection/Remote Shooting → Smartphone Connection and leave it on the waiting screen; confirm pairing on the phone and press OK on the camera. Don’t pair with a USB cable plugged in.
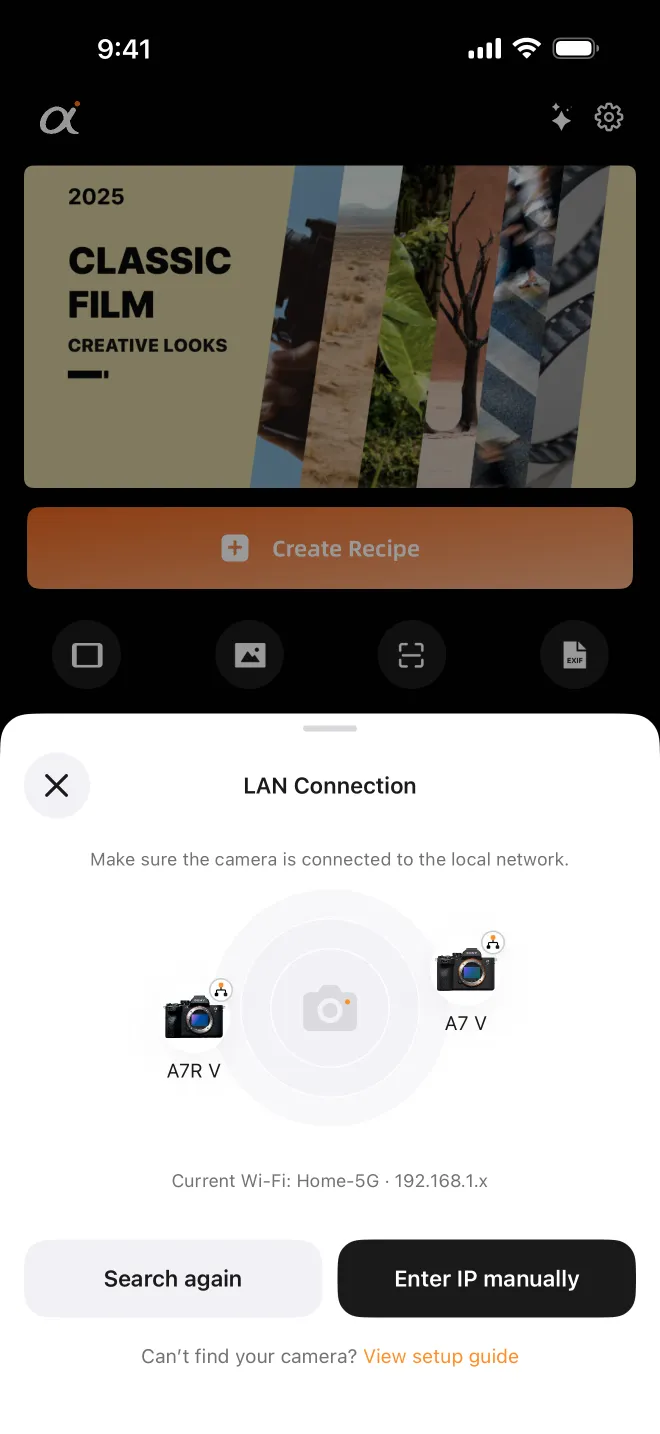
- Same network: join the camera to your Wi-Fi, turn on remote shooting and access authentication, then tap your camera in the list — or type its IP address from Network → View Network Settings.
- USB: set USB Connection Mode to Remote Shooting and use a data cable. See the USB checklist.
From card to camera
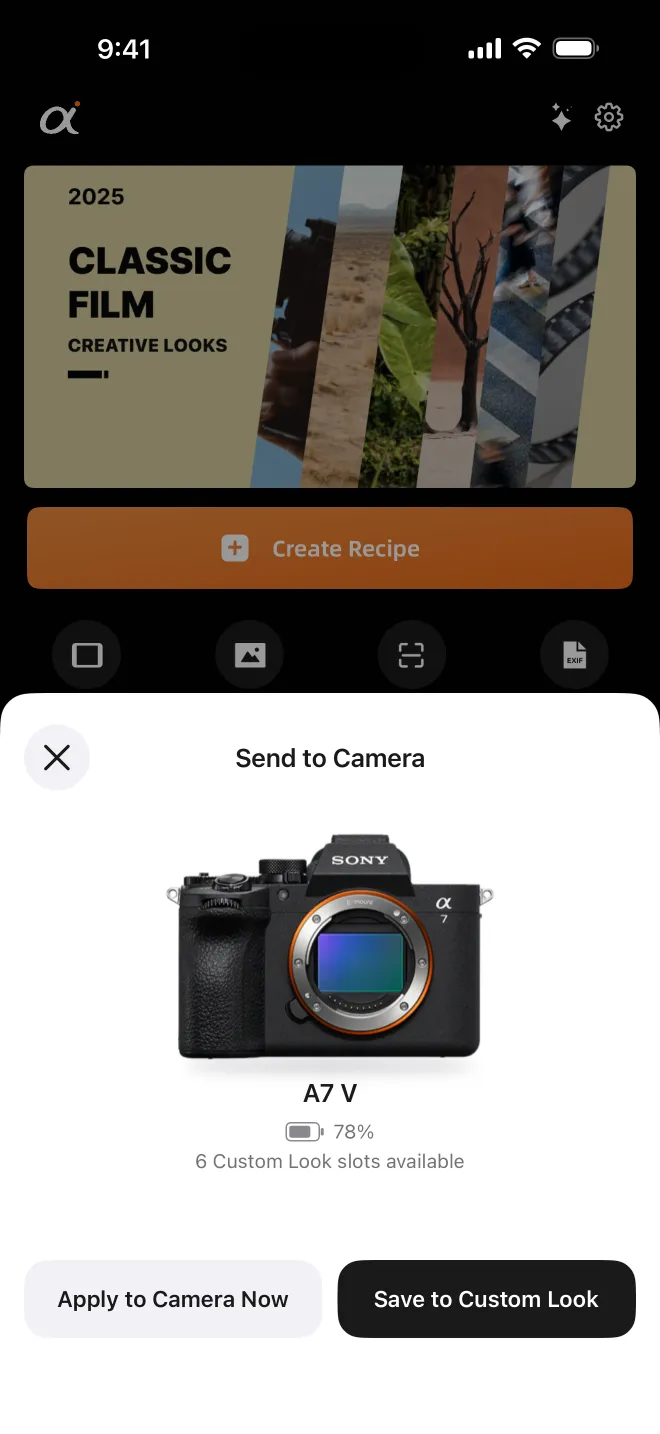
Once connected, open a recipe and import it. The whole recipe is written in one go — onto your current settings or into a Custom Look slot — and every change is listed before anything is written. Wireless and USB share exactly the same write flow.
Which cameras (last checked 2026-09-19)
| Camera | Bluetooth | Wi-Fi QR | LAN | USB |
|---|---|---|---|---|
| α7 V | Verified | Verified | Verified | Verified |
| α7R V | Not yet verified | Not yet verified | Verified | Verified |
| α7C II, α7CR, α7 IV, ZV-E1 | Not yet tested | Not yet tested | Not yet tested | Verified |
| α7 III, α7C, α6400, ZV-E10, ZV-1 | No (Creative Style body) | No | No | No |
Swipe sideways to see the whole table →
The α7R V splits PC Remote and Smartphone Connect into separate menus, and its smartphone hotspot doesn’t accept remote control (likely the same on the α7C II and α7CR) — on these bodies, start with LAN or USB. Untested isn’t unsafe: the app checks the camera before writing and writes nothing to a body it doesn’t support.
Won’t connect? Check these first
- Turn off any VPN or proxy — they intercept traffic meant for the camera.
- Quit Creators’ App and Imaging Edge, and keep a memory card in the camera.
- Bluetooth stuck? In iPhone Settings → Bluetooth, forget the camera and pair again.
- Camera missing on LAN? Make sure the phone isn’t still on a camera hotspot, or type the IP address.
- Drops after a while? Keep AlphaLuma in the foreground — iOS suspends apps left in the background.
Need a card to send? Browse free recipe cards — every value listed — save it in AlphaLuma once, then send it over any of the four paths. Comparing all the options, typing included? See Manual vs USB vs wireless.
FAQ
- Does the recipe travel over Bluetooth?
- No. Bluetooth only wakes the camera and asks it to open its Wi-Fi Direct hotspot; the recipe itself is written over Wi-Fi.
- Why won’t my α7R V connect over Bluetooth or the camera hotspot?
- The α7R V separates PC Remote from Smartphone Connect, and its smartphone hotspot doesn’t accept remote control. LAN and USB are verified on the α7R V, so start there.